Solak is one of the most powerful bosses in Runescape 3. He can be fought in a variety of different team sizes, from one to seven players per fight. His HP and mechanics will scale up as more players join the fight. Solak is known for dropping some of the best ranged weapons in runescape, the blightbound crossbows. In this guide we will provide a simple overview of his mechanics and phases, which will be perfect for learners.
How to get to Solak in RS3?
Players can find Solak in the Lost Grove, which is an island just west of Tirannwn. To get here players can use one of the following methods:
- Inspect the sandstone south of the poison waste.
- Incandescent wisp teleport on the elder divination outfit.
- Solak boss portal teleport.
- Castle wars teleport and run west.
After you arrive on the island for the first time you can also use 5 bittercaps on the mushroom in the center of the island, this will allow you to get here fast using the fairy code B-J-S.

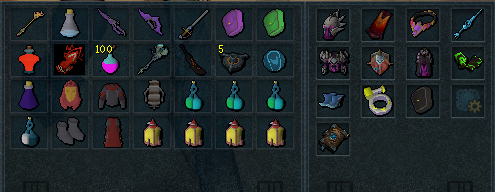
Gear & Presets for Solak
Your presets and choices of gear and weapons are important for Solak. Below you can see two different presets for all purposes. These are great for learning Solak. When you become more advanced you can make further changes to these setups.
Base Casual All Purpose
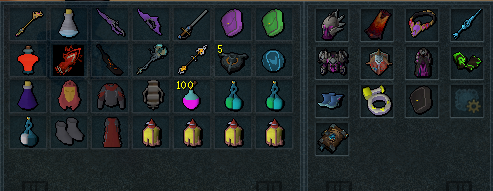
DPS Casual All Purpose
Solak Mechanics & Strategy
Solak is a four phase fight, in which there will be numerous different attacks and mechanics you will have to negate, to get kills successfully. These mechanics can happen at different points through-out the fight and are as follows.
Pads
At 0:11, Solak will spawn 1 green pad for each player in the battle at random locations around the arena. Players must each stand on a pad by the time the falling spore reaches the ground or all players will be dealt 5-6k blight damage per pad missed. Use movement based abilities (surge and bladed dive) to quickly make it to a pad.
Whether the pads are successfully intercepted or not, all players will be given an extra bar above their head which is a hard typeless blight bomb that will hit 8-10k if not handled correctly when the bar fills up. Make use of Disruption Shield or Resonance to entirely negate the bomb’s damage. Note that proximity to the boss will affect when you are hit by an auto attack which will change the timing of your Disruption Shield or Resonance.
Volatile Rootlings
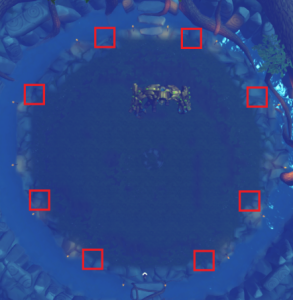
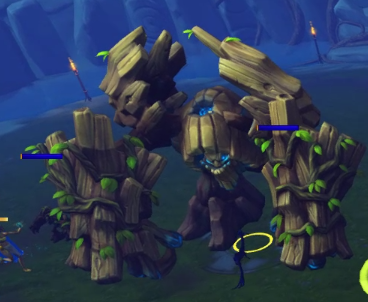
At 0:21, Solak will summon 8 volatile rootlings around the edges of the arena. They each have 20,000 hp in a duo and gain 12,500 hp for every additional player in the instance. If these aren’t killed by around 1:30, they will animate into Blightbound Lashers that deal heavy range damage and heal each other.
Personal Roots
At 1:06, Solak will choose 2 random players to be targeted by a Blight Root mechanic. Each affected player will be given a text box informing that they have Blight Roots which also will include a timer that counts down in ticks. There will also be yellow arrows at the players’ feet, on the minimap, and on the arena itself indicating the location that the roots will be coming from. When the timer reaches 0, the roots will pinpoint the players’ location and launch towards them, from the yellow arrow, to the pinpointed location.
The player must move 1 or more tiles away from the pinpointed location and away from the area of the Blight roots to not take the massive damage from the roots. If the roots manage to hit you, you will be stunned and must freedom the stun and proceed to move out of the area. It is best to anticipate or freedom before the timer reaches 0 to ensure that, even if you are hit, you will not be stunned.

Blight Bomb
At 1:32 and 1:49 and throughout Phase 3, up to 3 non-base roles will receive a bar above their head which will explode for 3.5-4k when the bar fills. This can be Resonanced for a heal, debilitated, disruption shielded, or simply tanked assuming the 4k hit will not be an issue.
Arms and Legs
At 1:55 (1:06 for rootskips, 1:32 and 1:49 respectively for bomb skips), Solak will stop attacking and teleport to the center of the arena with his arms rooted to the ground. The arms have to be killed within 30 seconds or Solak will stand back up and spawn Blightbound Lashers. After the arms are both dead, Solak will stand up allowing his legs to be attacked. You have 20 seconds to kill these or, like the arms, Solak will stand up and spawn Blightbound Lashers.
Core
After both the arms and legs have been killed, Solak will expose his core. The core has 125,000 hp per person in the fight and the team will have 18 seconds to damage it before Solak stands up and repeats Phase 1 mechanics until he is phased. Once the core is dead, Phase 1 ends and Phase 2 begins.

Eruptions
At the start of Phase 2, four eruptions will spawn at the corners of the arena (1 at each corner). When killed, these eruptions will spawn a blue circle that will teleport everyone within up to the Anima Storm 5 seconds after the eruption dies.
Cleanse/Blight Stacks
In Phase 2 and Phase 3, Merethiel can be clicked to activate a green circle on the ground at the south that will remove all Blight Stacks from players standing within. Blight Stacks appear on the players’ debuff bars. Each stack will cause players to do 1000 less damage per click to the Anima Storm. Additionally, players will receive 1% more damage per stack accumulated.
Anima Storm
Persists from the beginning of Phase 2 until it is killed. Every 10 seconds, it will drop blight rain onto the arena hitting all players for 2k damage and will add a blight stack to the player’s debuffs. It is destroyed by teleporting via the erupts and spam clicking the storm once in the sky. It’s also important to note that as the storm “rains” down onto the arena, a puddle of blight rain will begin to form in the center. Players should take care to stay away from the puddle as it will hit players for almost 2k damage per tick and will add a blight stack for each hit. While in the sky damaging the Anima Storm, players can ensure they fall to the ground outside of the puddle by clicking away from the center.

Blight Spores
Six auto attacks after all eruptions are dead, Solak will spawn Blight Spore bombs all around the arena. The spores will rise into the air, fall back to the ground, and explode. The longer the mechanic has progressed, the more damage they will deal. Towards the end of the mechanic, they will hit up to 8k and should be avoided at all costs.
Anima Rain
12 auto attacks after Solak summons the Blight Spores, they will dissipate and Solak will send Anima Rain from the sky. It will hit 5 times total across several seconds, with each hit dealing up to 8k damage. The Blessing of Nature shield dome must be used to lower the Anima Rain damage by 75%.

Arm Climb
2 auto attacks after the last hit of Anima Rain, Solak will randomly pull 1 player in to be rooted to the ground. The player must either Anticipate before being pulled in or Freedom from the roots and move out of the tile that Solak slams his arm on. Failure to do so will result in being insta-killed. After he slams his arm down, the arm can be clicked for the player to climb up. A deadly blow will be dealt to Solak and shortly after, Solak will retaliate with a massive melee attack that can hit up to 9k.
P3 Pad
At the start of Phase 3, eight pads will spawn around the arena. As Solak stands on this pad, it will charge up (indicated by the blue ring on the outside of the pad). It takes 15 seconds for a pad to become fully charged. Solak will stop attacking and will begin shaking rapidly for 12 seconds. During this 12 second window, players may use their Extra Action Button to access the Realm.
Quick Guide for Solak Phases
Phase 1
The goal of Phase 1 is to damage Solak down to his HP cap while handling the few mechanics that interrupt damage. Killing the Core will transition the players from Phase 1 to 2. Follow these steps during phase 1:
- Death Swiftness, Sunshine, or Berserk and begin damaging Solak.
- Get a pad and continue damaging. Negate the damage from the pad bomb.
- Damage until 0:50 at the latest.
- Begin killing your volatile rootlings.
- Handle the personal root mechanic at 1:06.
- Continue damaging until the 1:32 and 1:49 blight bombs. Continue damaging between these bombs.
- Kill the arms while saving adrenaline to damage boosting ultimate at the end of arms.
- Build adrenaline on the legs as you kill them.
- Dump everything into the core.
Phase 2
The goal of Phase 2 is to kill all 4 Eruptions and the Anima Storm. Then, damage Solak until his corruption bar has been drained completely. Once it is completely drained, players will be in Phase 3. Follow these steps during phase 2:
- Kill a south eruption, cleanse, go up to damage the Anima Storm, repeat (without cleansing) until Anima Storm is dead.
- Meet at the very north of the arena in the hole. Damage boosting ultimate ASAP.
- Damage Solak while avoiding Blight Spores.
- Use the blessing of nature when the Anima Rain comes. Continue damaging until the Arm Climb.
- Continue damaging until Phase 3 if he isn’t already phased. Do not use a second damage boosting ultimate unless its absolutely required (low damage).
Phase 3
The goal of Phase 3 is to damage Solak down to his HP cap then kill Erethdor. When Erethdor dies, Phase 4 will begin. Follow these steps during phase 3:
- Damage boosting ultimate and dump good abilities.
- Go in at the end of the first pad being charged. Dump good abilities into Erethdor.
- Continue damaging Solak when you’re put back on the arena. Use a second damage boosting ultimate only if Solak has a lot of remaining hp.
- Watch for Blight Bombs and stun Solak when required.
- When Solak is at his hp cap, finish Erethdor off. Have full adrenaline when he dies.
Phase 4
The goal of Phase 4 is to damage Solak down to 0 hp before the manifestations kill him in the Realm. Follow these steps during phase 4:
- Wait at Solak until he becomes targetable.
- Damage boosting ultimate ASAP and basic camp Solak to build adrenaline.
- After Solak’s animation, start dumping good abilities into him. Save hard hitting abilities for later in your rotation (sgb, dark bow, omnipower, overpower, etc).
- If realming, a stun will be required when Solak says “THIS ENDS NOW”.
- Either wipe or get the kill.
In-depth Video Guide
Solak Discord

Learn more about Solak, form teams, get personalised advice and see more presets and strategies over at the Solak Discord.