Urogrim is a legendary void affinity champion from the ogryn tribes faction in Raid Shadow Legends. He is a strong support-based champion who offers a significant amount of poisons. Additionally, this champion benefits from strong AoE and single target heals. However, the main drawback to using Urogrim in late game scenarios is that his A2 is purely single target, which means he falls behind better options in late to end game content. Although, he can still provide good usability in spider and clan boss. Furthermore, during the mid game his 20% aura for speed can prove to be extremely useful. He makes a good champion for both solo and team runs, of which we will cover in-depth during this guide.
Urogrim Stats Overview
- Faction: Ogryn Tribes
- Type: Support
- Affinity: Void
- Rarity: Legendary
- HP: 19155
- Attack: 881
- Defense: 1145
- Critical Rate: 15
- Critical Damage: 50
- Speed: 102
- Resistance: 30
- Accuracy: 15
- Aura: Increase Ally SPD in by 20
- Books to Max Skills: 13
Urogrim Skills Overview

A1: Skullstaff
Attacks 1 enemy 2 times. Each hit has a 25% chance of placing a 5% [Poison] debuff for 2 turns.
Upgrades as follows:
- Level 2: Damage +5%
- Level 3: Buff/Debuff Chance +5%
- Level 4: Damage +5%
- Level 5: Buff/Debuff Chance +5%
- Level 6: Damage +10%
- Level 7: Buff/Debuff Chance +10%

A2: Tingly Tincture
Removes all debuffs from an ally, then heals them by 40% of their MAX HP.
Upgrades as follows:
- Level 2: Heal +5%
- Level 3: Heal +5%
- Level 4: Heal +5%
- Level 5: Cooldown -1
- Level 6: Cooldown -1

A3: Bizarre Vapors
Places two 5% [Poison] debuffs on all enemies for 2 turns. Also places a 15% [Continuous Heal] buff on all allies for 2 turns.
Upgrades as follows:
- Level 2: Cooldown -1
- Level 3: Cooldown -1
Urogrim End Game Guide
Urogrim is an Epic Void affinity champion that can help out in many different areas at any stage of the game. He is a strong poisoner and healer with a kit similar to Bad El Kazaar. This allows for him to be viable in almost all aspects of the game and he is extremely versatile; able to solo content in various areas with the proper gear.
Skills
Booking out all of his A2 and A3 to the max is necessary to get maximum value. With A2 he will remove all debuffs from an ally and heal them by 40% of their maximum health. Booking this skill allows for higher healing %, along with decreasing it to a 3 turn cooldown. The A3 skill only needs two books and will reduce the cooldown for Continuous Heal buff along with placing two 5% Poison’s on the enemy team that will last for two turns. If you have the luxury of extra books, investing in his A1 is ideal for the extra Buff/Debuff chance percentage to place a 5% Poison for two turns.
Masteries
The Offense and Support masteries were selected due to gaining increased Accuracy as well as the extra damage from Warmaster. Warmaster is taken due to the fact that Urogrim is mostly a PvE Champion, primarily used in Late Game+ to solo content such as Dragon 20. Because of this, the procs from Warmaster provide quite a lot of additinla damage that adds up. The other Offense Masteries are not as important, but help with the damage output a bit.
For the Support tree, Pinpoint Accuracy, Charged Focus, and Swarm Smitter were taken to help build Accuracy to land debuffs. Master Hexer and Sniper were taken to increase the chances of his A1 landing. All of these perks also help fully enable both A1 and A3.

Gear & Stats Build
Due to Urogrim being a Support based champion stacking as much Health and Defense is the priority. When we are looking at him for general content, the stat to consider is his Speed, you need him taking turns relatively quickly, preferably 240+ Speed for solo dungeons. We need him to be rotating his A3 as much as possible because this is the key to his dps.
Although not covered in this build, if you’re looking to use Urogrim for Clan Boss, here are some safe guidelines to follow;
For Nightmare Clan Boss you want a minimum defense of 3 – 3.5k and health at 35k. To consistently land debuffs on the CB you would be needing 200+ Accuracy minimum. Furthermore, due to the NM CB being at a speed of 170, you would want your Urogrim [and the rest of your team] at 171 – 190+ speed to make sure you go 1:1 with the CB. Urogrim must be the fastest in the team if he is your designated stun cleanser.
Main Stat Recommendations
- Gloves: Def% / HP%
- Chest: Def% / HP% / Accuracy
- Boots: Speed
- Ring: Def / HP
- Amulet: Def / HP / Accuracy
- Banner: Accuracy / Def %/ HP%
Recommended Stats (For everything except Clan Boss)
- 240+ Speed
- 50k+ Health
- 2k+ Defense
- 250+ Accuracy
Recommended Sets
- Relentless/Reflex
- Immortal/Regen
- Speed/Perception

Solo Dungeon Runs
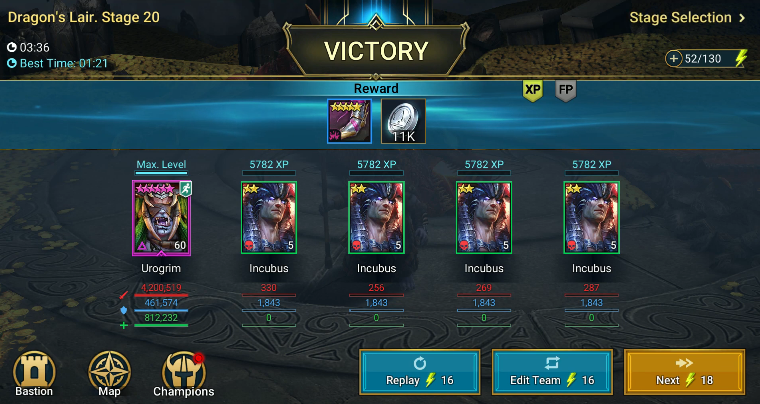
Solo Dragon 20
Urogrim can solo Dragon 20 with 4 Food champions is a late game staple. The goal is to maximize the efficiency of your Energy usage while maintaining the benefit of leveling champions and getting Gear.
Although it isn’t required, if your goal is to be soloing either Dragon 20 or Ice Golem 20, it is recommended you have at least 200+ Resistance. This isn’t a requirement as Urogrim can Cleanse himself, but, there are some nasty Debuffs you will want to avoid getting hit by. Keep in mind if you want to do this method then eventually the food champions will reach maximum level. With multi-battles you can set it to automatically swap in new champions.
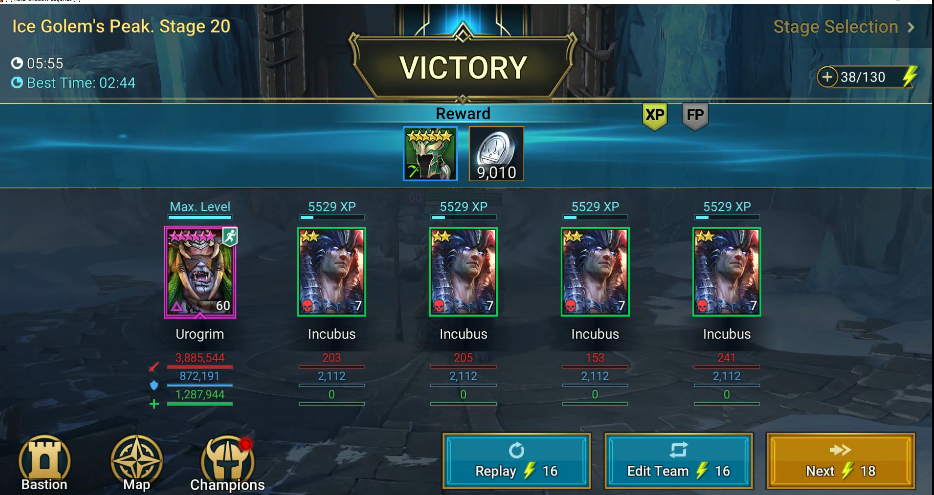
Solo Ice Golem 20
Dragon dungeon is not the only one Urogrim can solo. Ice Golem can also be completed with just Urogrim as Poison damage doesn’t trigger Frigid Vengeance if it goes over the damage thresholds.
The idea for this is very similar to Dragon 20, the core goal here is to be getting the most from our Energy, not necessarily running the dungeon in the fastest manner. Because of this, we show Urogrim with 4 other Champions used for food later.
As suggested in the Dragon section, you will want 200+ Resistance if you can get it, especially for Ice Golem. Decrease Defense and Heal Reduction the bosses minions cast can be nasty. However, Urogrim does have a Cleanse, so as long as he is quick enough, or you have Reflex/Relentless procs, you don’t have to have it, but it is still recommended for run safety.
Solo Minotaur
For Minotaur, the most common reason to use Urogrim is because he can solo it, the same as the Arcane Keep and some other Dungeons. Keep in mind that while this is energy-efficient, it’s not time efficient. The most common reason to use Urogrim in this role is to be farming scrolls and/or leveling other Champions you intend to use. Typically when people do something like this, they will load up on several thousand Energy, and let it run overnight with something like RSLhelper or multi-battles.
This effectively allows you to level up to 4 Champions, and get them masteries, all at the same time, which is fantastic for efficiency, especially if you’re free to play, and that’s something you need to be considering. However, once again, we do lose the ability to clear it in a minute or so, although Urogrim only makes it about 3-4 minutes so it’s not massive, but, it will make doing things daily take much longer. This is the reason it’s often ran overnight

Solo Arcane
Arcane Keep is another solo area for Urogrim where he is used to help clear the early waves while maintaining Health. Once at the Boss, he becomes a damage dealer and helps to down the Boss quickly due to the abundance of Poisons he provides for the fight which stack. His ability to cleanse and heal debuffs will help keep the team topped up and make the fight as short and safe as possible. He is dependable for all keeps due to his void affinity and there being no potential for weak hits. Because of this, Urogrim can be used in effectively every and any team for Keeps, and there are no strict guidelines on who you can and can’t use with him.
There are a couple of things to note however, the first is, he cannot solo Spirit Keep, due to the Bosses Healing mechanic, he won’t be able to out Poison it on his own. But he is able to solo other Keeps.
Secondly, if you intend is to use Urogrim only as a solo Champion, then you may want to take the Spirit Haste (Support) mastery, which will provide him with more Speed when Allies are dead. We do this because the most common reason to solo farm somewhere like Arcane 20, is to level 4 other Champions, maximizing Energy efficiency, but you will be trading off how fast you clear the Keep.

Team-based Content
Ice Golem 25
For the Ice Golem 25 run, we are using a relatively accessible team overall. Urogrim has been able to solo this and Dragon 25 in the past, however, the gear requirements are extremely high, and things can go wrong, so it’s better to be using him in a safe team, especially while progressing.
Because Urogrim puts so many Poisons up, he can be our main source of damage again, even though for this run, we do showcase him with another Poison based Champion (Richtoff). Richtoff is purely here to make things faster, and is in no way required.
The biggest thing to consider is that adding a wave clearing champions such as Seer or Royal Guard, will make this run much faster. You do need to be careful, because if they nuke into the boss at the wrong time, it will very likely wipe you with Frigid Vengeance. For this reason, we use Poisons, instead of Max HP hits. This will depend on your account, and you can just disable the Max HP attack in the preset AI if you wanted.
Team Build
- Richtoff – More Poisons, makes this run faster and safer as the boss will probably tick over the HP thresholds to do his big slam and resummon the minions. You don’t need him here however, as mentioned above, and this slot can just be a generic damage dealer slot if you wanted.
- Scyl – Healing and Revive, this boss hits hard, and she can often survive the hits and bring Champions back up if they go down.
- Achak – Mainly here to keep the waves Crowd Controlled, this isn’t really required, especially since Scyl brings plenty of Stuns on her own.
- Serris – We aren’t running any direct damage dealers, so Decrease Defense is wasted to an extent, but will gain more value if you use a Max HP Champion like Royal Guard. Serris is here almost exclusively for the AoE Decrease Attack, this helps ensure almost 100% uptime of the debuff on the boss, which is a ton of survivability.

Dragon 25
For Dragon 25, the concept is very similar, however, Dragon hits a lot less than Ice Golem, so we can safely take away the Decrease Attack from Serris.
Urogrim is able to solo if you want him to, and you can run Supports to back him up. However, to make the run faster, it is recommended to bring at least 1 damage Champion in. Because we don’t need to worry about Max HP hits triggering boss mechanics, the #1 Champion here for speeding this up will be Seer. However, Royal Guard does help a lot as well.
Team Build
- Achak – Crowd Control for the waves. Scyl is negative Affinity so it’s recommended to run at least 1 Champion alongside Scyl to help control the waves, and we are using Achak
- Richtoff – Purely Poison damage, as mentioned above, Max HP hits like Seer are actually preferable for quicker runs. There is 1 free slot in this team, and Richtoff himself isn’t required. This means you could run something like Lydia + Seer if you are later and get through the waves in 17 seconds.
- Scyl – Mainly here for the Healing and some Crowd Control on the waves. We won’t need to rely on her Revive like in Ice Golem, as by this stage we can often survive all the damage incoming, but, it is a good thing to have ready just in case.
- 4th Slot – As mentioned in the Richtoff slot, this is left free for basically any Champion. As you start developing your account more, this can become a much faster Seer + Lydia combo, however, for the time being you could use pretty much anyone, Bellower for wave control, Kael for more damage, Seer for nuking waves, Reliquary Tender for another revive. It’s entirely up to you.

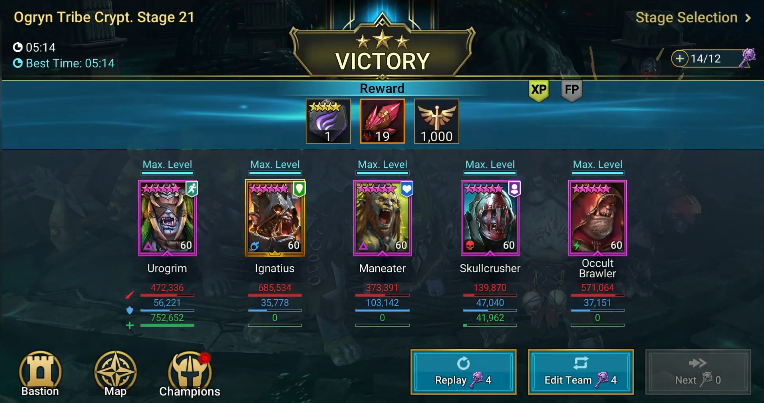
Faction Wars
Although Ogryn Faction Wars aren’t considered extremely hard Urogrim can be a great help. For the boss, it’s recommended to be using either a Cleanse or Block Debuffs. For this reason, Urogrim fits very nicely into a team, even in conjunction with Maneater.
Since we went for Warmaster, and we have the Accuracy to land all of the Poisons, you can actually run 4 Supports with Urogrim, and have him as your damage dealer, the run will be slower, but it could also be safer if you’re just looking to clear FW21 for the first time.
Team Build
- Ignatius & Occult Brawler – They both provide us with more damage, to make the run faster, this isn’t needed, you can rely on Urogrim for damage, so for this reason, these spots aren’t required and is pretty flexible on who you can use.
- Skullcrusher – The Ally Protect and Counter Attacks make the run much smoother, neither is needed though. The boss doesn’t hit incredibly hard, a lot of his damage comes from HP burns so Ally Protect is just a nice addition to make things smoother.
- Maneater – The Block Debuffs is very nice for this, and since Ogryn are very low on Revives, the Unkillable makes the 3* very comfortable. However, this isn’t required, you can rely on Urogrim to Cleanse, or you can run another Champion like Uugo. Drokgul is also really good in this position although he provides neither, but the Shield and healing can mitigate the damage.
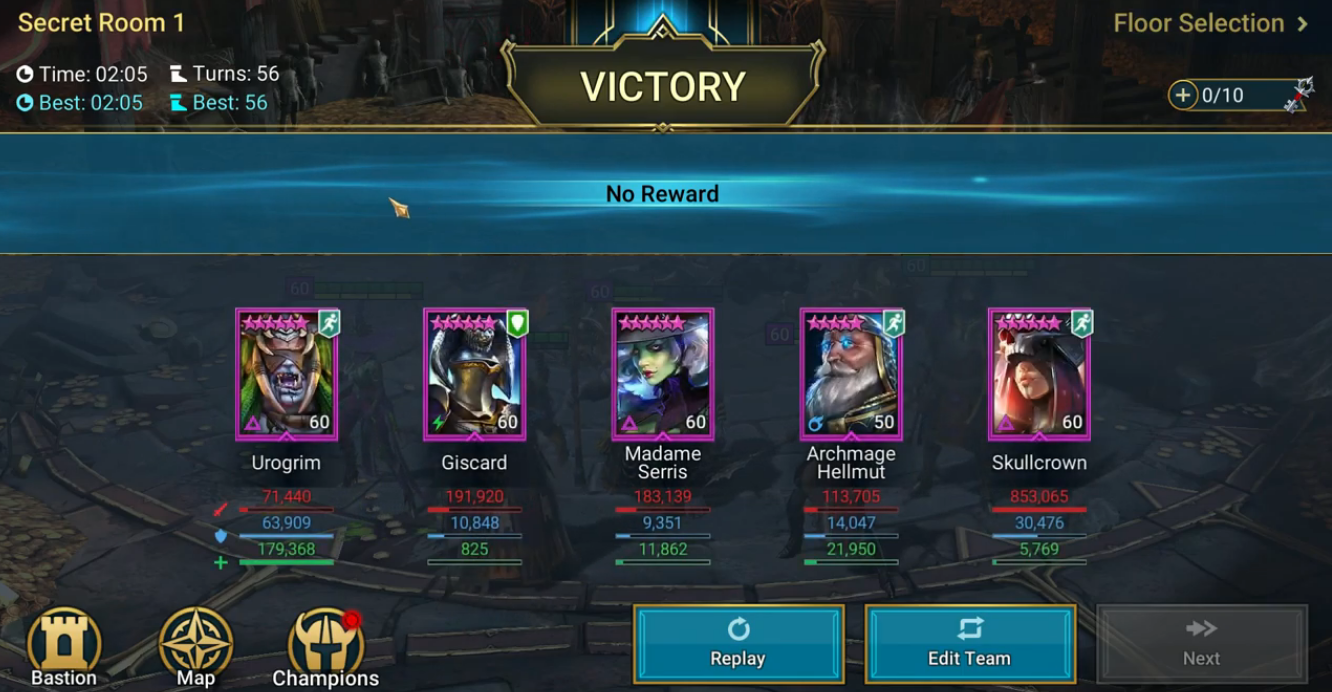
Doom Tower Secret Room 1-1
Often the easiest way to go through Secret Rooms in Doom Tower is Crowd Controlling the waves to death. This is true for 1-1. The first Secret Room floor in every Rotation is the same, it’s always Epics only. For this reason, this team can be used every time. However, by the time you are doing Doom Tower hard, you will probably have plenty of maxed Epics to choose from.
Team Build
- Urogrim – In this team is our Healer and some extra Poison damage which helps clear the waves faster.
- Serris – The Decrease Attack and Defense Down, make the runs much faster, especially since we are using a generic damage dealer (Skullcrown) and it ensures if the enemies do get a turn, they won’t instantly kill whoever they attack.
- Hellmut – He provides a large amount of Crowd Control on his A2, which as mentioned above, is often the key to beating Secret Rooms.
- Skullcrown – Generic damage dealer, since Hellmut is on the team, you can use Seer instead which would be a bit quicker. But since you only need to clear these rooms once per month, it doesn’t matter, you just need to get through it once.
- Giscard – Provides a substantial amount of Crowd Control alongside Hellmut. There are 50+ Epics in the game that provide really good control however, so use who you have.
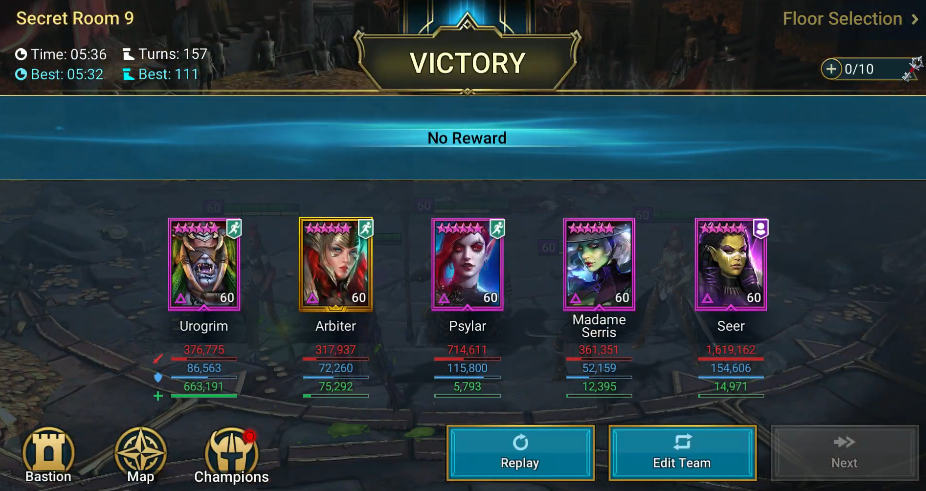
Doom Tower Secret Room 9-3
This room requires Void Support Champions only. This isn’t as restrictive as it seems as there are a lot of Champions that fit this requirement and are naturally built anyway. For this reason, Urogrim can actually be used in any number of ways. However, since Arbiter will most likely be in this team, Urogrim will fall into more of a damage based role with his Poisons.
Because there is a Siphi in the 2nd wave, and Arbiter in the 3rd, it’s not recommended to rely purely on Urogrims damage, but you can if required, you will just need to consider some way of bringing a Block Revive, the easiest is Lydia. You can also run more Crowd Control to just stop them from casting the Revive in the first place.
Team Build
- Psylar – She is in a Stun Set, gives us lots and Crowd Control, between the Stun and Decrease Turn meter. Also the Decrease Accuracy is very nice for this stage, especially with Champions like Venus and Serris on the other team.
- Serris – Decrease Defense doesn’t help too much, but, there are a lot of Buffs on the enemy team, including Broadmaws and Siphis, because of this, some form of Buff Strip is recommended, however, Arbiters A2 can do this (sort of).
- Seer – More Buff removal, but, also a large portion of our damage to make this run quicker. The only issue here is that we don’t have a champion that provides a lot of Buffs. Lydia is fantastic here over Serris for this reason, and if you have access to her you may want to use her.
- Arbiter – She will be a staple of this team for most people, the main reason is Turn Meter Boosts, you probably won’t die much on this Secret Room as the enemy only has Support Champs as well, so not much incoming damage to worry about. But the Buff removal on the A2 and Turn Meter Boost is fantastic for this floor.