Wurlim Frostking is a legendary void affinity champion from the knights revenant faction in Raid Shadow Legends. He features an A2 that does not require accuracy to land and he is able to provide the strengthen buff, which is one of the best in the game. Wurlim can be useful for teams in Clan Boss, Dungeon Raids and Hard Dreadhorn, we have provided information on the strategies and compositions used for each in this Wurlinm Guide. We have also included information on how best to gear Wurlim, with details on masteries and stats.
Wurlim Stats Overview
- Faction: Knights Revenant
- Type: Defense
- Affinity: Void
- Rarity: Legendary
- HP: 19650
- Attack: 1035
- Defense: 1233
- Critical Rate: 15
- Critical Damage: 50
- Speed: 100
- Resistance: 30
- Accuracy: 20
- Aura: Increase Ally in Doom Tower battles by 40
- Books to Max Skills: 12
Wurlim Skills Overview

A1: Winds of Winter
Attacks 1 enemy. Has a 30% chance of placing a [Freeze] debuff for 1 turn. Places a [Perfect Veil] buff on the ally with the lowest HP for 2 turns if the [Freeze] debuff is placed. Places a [Veil] buff on the ally with the lowest HP for 1 turn if the [Freeze] debuff is blocked or resisted.
Upgrades as follows:
- Level 2: Damage +5%
- Level 3: Damage +10%
- Level 4: Buff/Debuff Chance +10%
- Level 5: Buff/Debuff Chance +10%

A2: Frostbite Blast
Attacks all enemies. Has a 70% chance of placing a 25% [Decrease C. DMG] debuff and a 50% [Decrease ACC] debuff for 2 turns. These debuffs cannot be resisted. Also places a 30% [Increase C. DMG] buff on all allies for 2 turns.
Upgrades as follows:
- Level 2: Damage +5%
- Level 3: Damage +10%
- Level 4: Buff/Debuff Chance +10%
- Level 5: Buff/Debuff Chance +10%
- Level 6: Buff/Debuff Chance +10%
- Level 7: Cooldown -1

A3: Icegrave Armor
Places a 25% [Strengthen] buff and a 60% [Increase DEF] buff on all allies for 2 turns.
Upgrades as follows:
- Level 2: Cooldown -1
- Level 3: Cooldown -1
Wurlim Frostking End Game Build Guide
Wurlim Frostking is a Void Affinity Legendary Champion from the Knights Revenant Faction that could be obtained through the Battle Pass. Unfortunately, he was underwhelming and ended up being one of the worst Void Legendary in the game at the time. However, he was recently buffed and while he is not a top tier champion, he is more usable now.
This guide will feature Wurlim Frostking in PVE content of Dragon 20, Ice Golem 20, Fire Knight 20 and in a standard UNM and NM CB team.
Skills
The core skill set of this champion did not change but was made improved by making his main debuff ability irresistible which means he no longer requires accuracy in his build and the most notable change was lowering the cooldown of his ability that places Increase Defense and Strengthen to 3 turns. This allows him to be tuned in a regular CB team. Strengthen is a rare buff and is the best damage mitigation buff in the game at the moment. Having this buff in a standard CB team can extend your team’s survivability in CB allowing more damage.
In terms of books, there are two options. You have to either book both his skills down to 3 turn cooldown making him much easier to speed tune or leave him unbooked with both skills at 4 turn cooldown. If you plan to use him in CB unbooked, you will have to tune him to go 4:3 to use his skills in the correct rotation.
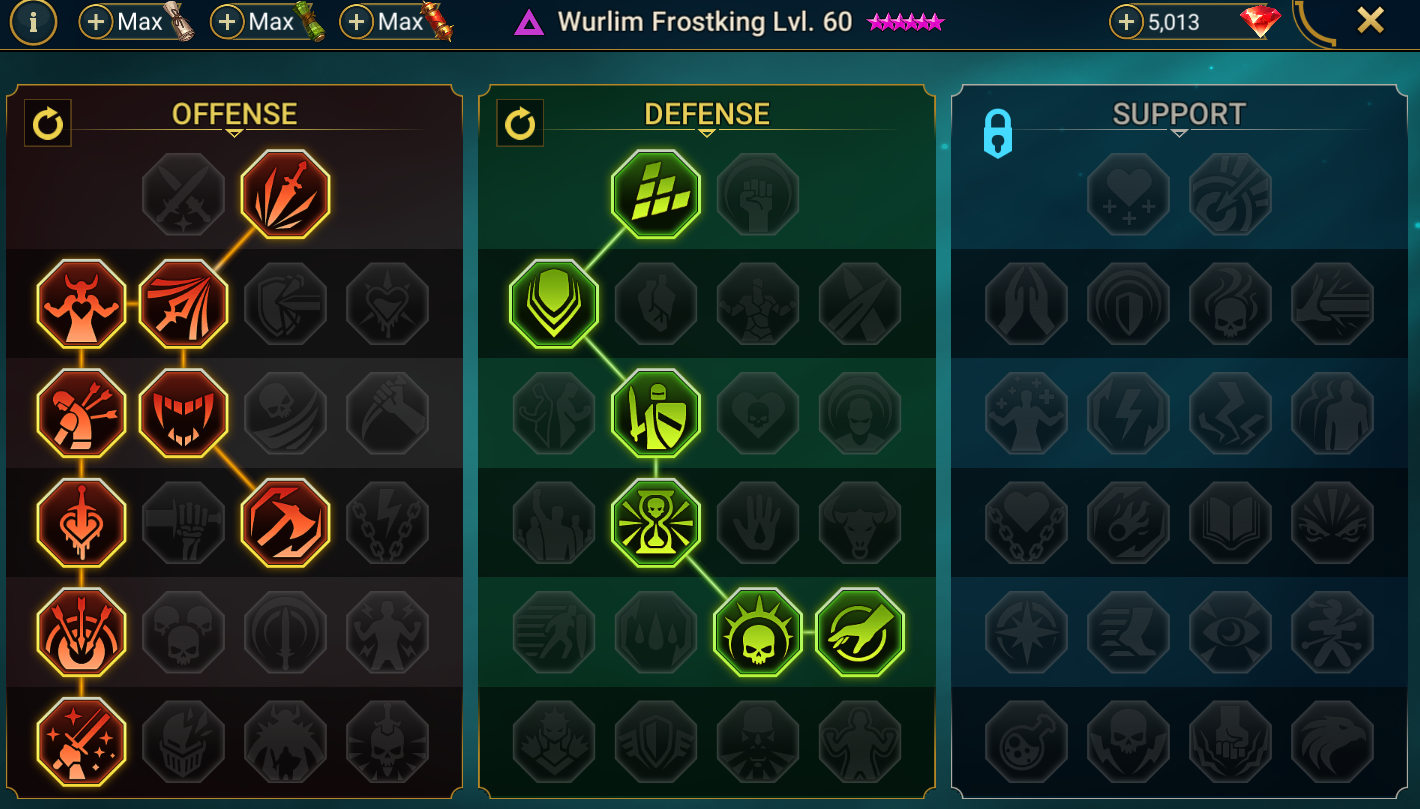
Masteries
Masteries for Wurlim is fairly simple. Since he doesn’t require accuracy to apply his debuff (apart from his A1 freeze which is not worth building accuracy for in most cases) we will avoid the Support tree and take the Offense and Defense tree.
In the Offense Tree, the standard PVE damage dealing masteries are chosen. Crit Rate, Crit Damage and all the damage increasing masteries on the left down to T6 Warmaster. In the Defense Tree, take the Damage mitigation mastery in Tough Skin, Blastproof, Delayed Death into both Counterattack masteries: Retribution and Deterrence.
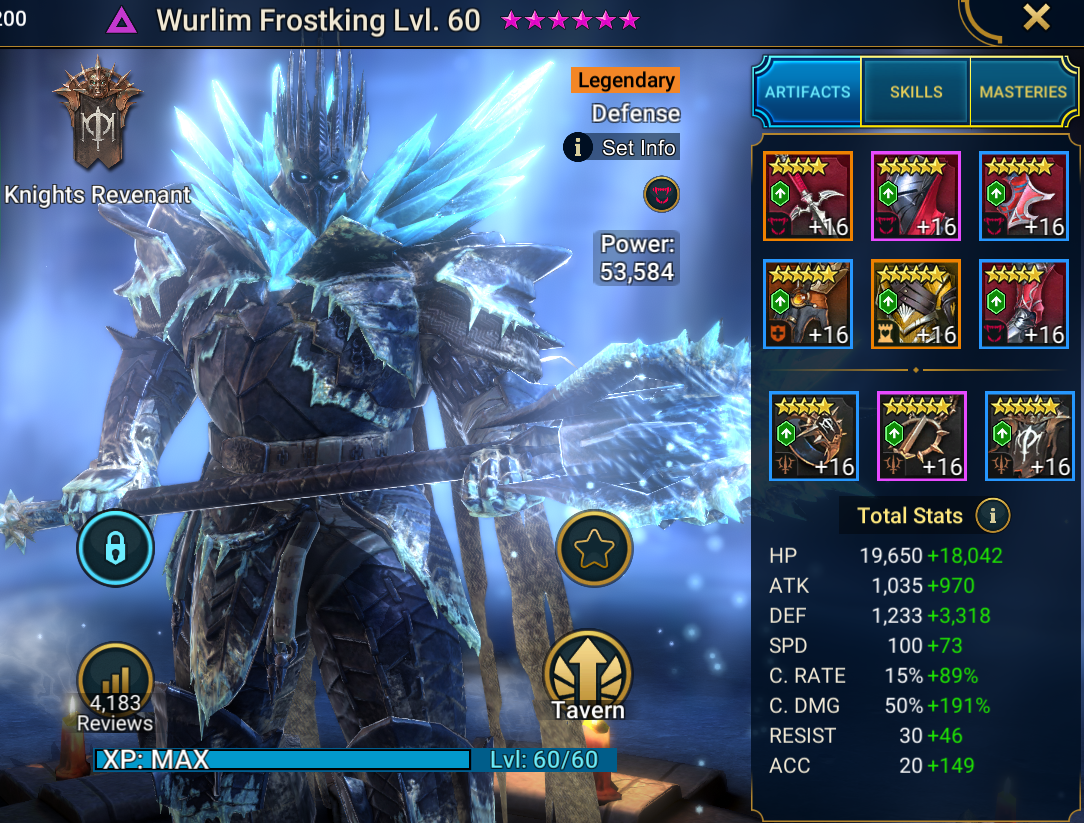
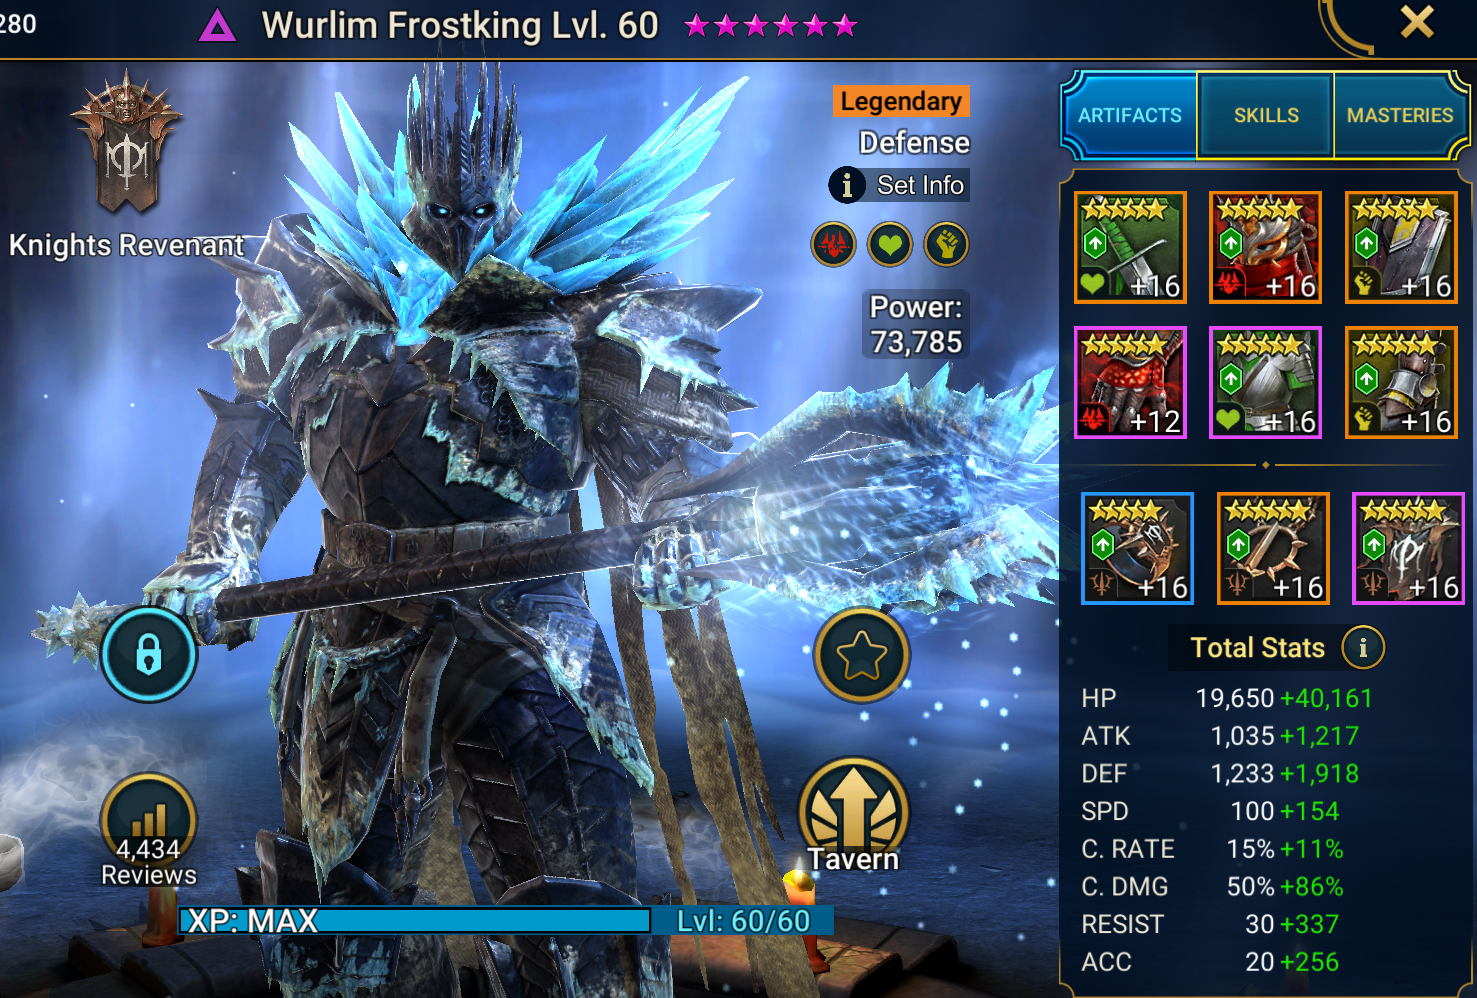
Gear & Stats Build
Gearing Wurlim is also fairly simple. Prioritize building him with Defense, Crit Rate, Crit Damage, and Speed. Ideally 4k+ Defense, 100% Crit Rate, 200%+ Crit Damage, and enough speed to fit your CB speed tune team. Since he does not require any other stats you should be able to build him with very high Defense and Crit Damage to maximize his damage.
Lifesteal set is a must for a standard CB team, unless you have Leech in your team. You can them use any 2-piece set or broken pieces to maximize his stats. The Wurlim build shown here is used in a slow speed tuned Clan Boss team, hence the 173 speed in Lifesteal. This exact build is used in all other content shown in this guide.
Recommended Main Stats
- Glove: Crit Damage
- Chest: Def %
- Boots: Def % / Speed
- Ring: Def
- Amulet: Crit Damage
- Banner: Def
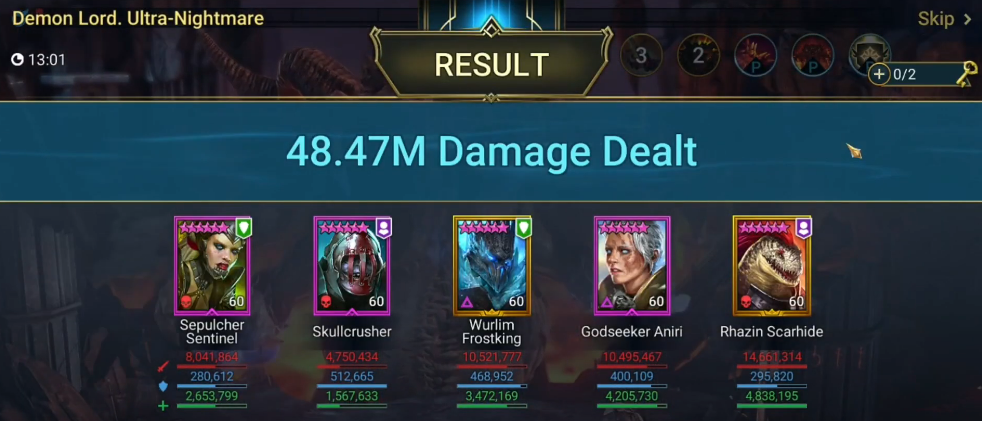
Clan Boss Team & Strategy
Wurlim is one of the few champions in the game that provides the Strengthen Buff to your team. This is the best damage mitigation buff in the game and is extremely valuable in non-unkillable CB teams as it improves survivability allowing your team to last longer. He also provide a minor buff, Inc Crit Damage that helps increase your team’s damage.
This is an example of a CB team that is built to take advantage of Godseeker Aniri’s Buff extension:
- Sepulcher Sentinel (227) – Atk Down, Inc Def, Block Debuff
- Skullcrusher (171) Ally Protection, Counterattack
- Rhazin (176) Dec Def, Weaken, DPS
- Godseeker Aniri (173) Buff Extension, DPS
- Wurlim Frostking (173) Strengthen, Inc Def, Inc Crit Damage, DPS
With Godseeker Aniri’s buff extension, this team is tuned so that Sepulcher’s Block Debuff is up for the Affinity Debuff and Stun which makes this team work on all affinities. Wurlim’s Strengthen and Inc Crit Damage buff are up for both AOEs which improves the team’s survivability and damage. Skullcrusher’s Ally Protection and Counterattack is up for both AOEs on all champions. Increase Defense is up 100% of the fight. There are a few turns of manual set up for this team to line up their skill order correctly before going full auto.
As you can see, the combination of defensive and damage mitigating buffs in an all Defense-based team allows the team to last a long time and comfortably hit well above the 2-key damage threshold for UNM and 1-key damage threshold for NM. While this team’s speed tune works on all affinities there is still a factor of weak hits. While this team will not be affected by the Decrease Speed Debuff from the Spirit CB, Sepulcher and Rhazin who are the main debuffers in the team can still weak hit and not apply their debuffs. Missing the important Atk Down can end the run early.
Dungeon Run Teams & Strategy
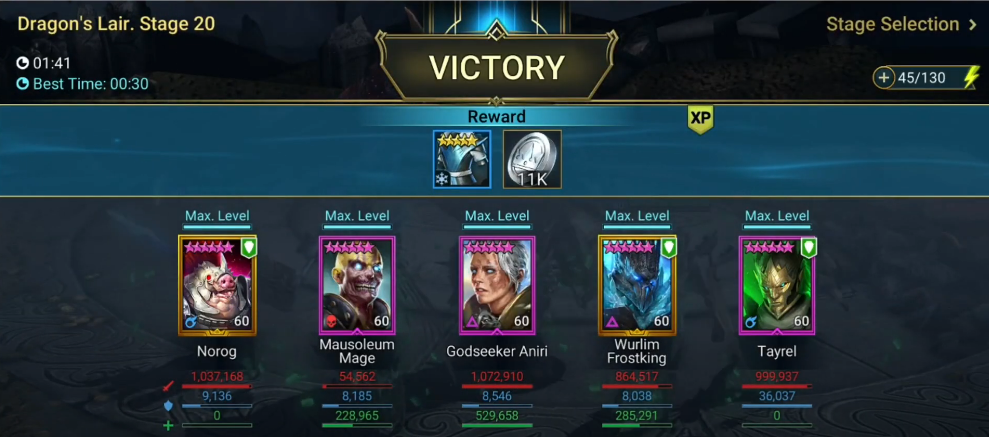
Dragon 20
Wurlim is fully capable of dealing damage as he has great damage multipliers. If used in a properly built team, he can perform well in dungeons as a damage dealer. This is an example where Wurlim is a part of an all Defense-based team for Dragon 20:
- Tayrel for AOE Defense Down
- Wurlim for his buffs and dps
- Godseeker for healing, revive in case anyone dies, and buff extension
- Norog for 40% Defense Dungeon Aura.
- Mausoleum Mage supports the team with his Defensive Buffs to increase your Defense-based champion’s damage before they nuke, Heals, and Cleanse.
All these Champion are hard hitting Defense-based champions and synergize of each other. As you can see, this team does not have any poisoners and takes down the Dragon entirely from dealing Raw Damage. Defense-based champions built with high defense for their damage also naturally increases their survivability, so they are much easier to keep alive than Attack based counterparts. They are in no danger of dying throughout the entire fight and if they do die, Godseeker can revive them.
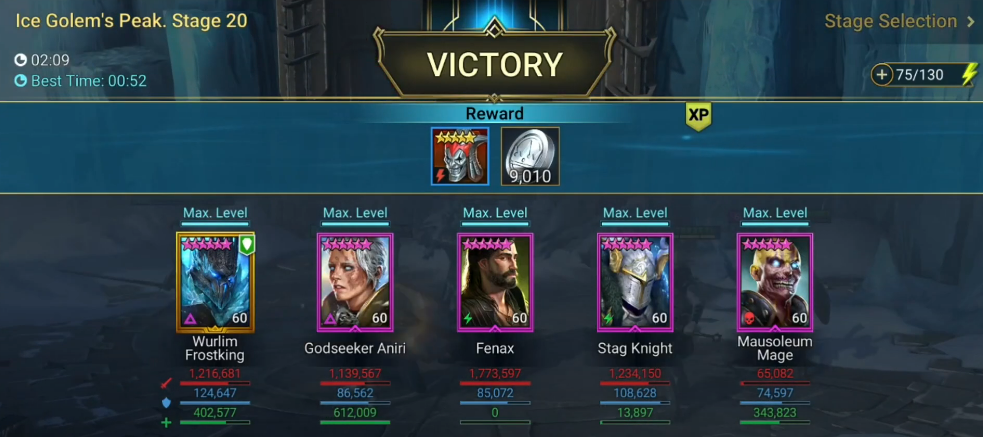
Ice Golem 20
Similarly for Ice Golem 20, you can build a Defense-based team that can perform perfectly well here. Wurlim can deal good damage and offer the Strengthen buff to the team here to negate some of the Ice Golem’s hard hitting AOEs. This is an example of a team built for Ice Golem 20with:
- Stag Knight to provide AOE Def Down and ATK Down for further damage reduction and speeding up the runs.
- Wurlim to provide his useful buffs to improve the team’s survivability and damage and deal damage.
- Fenax as the main damage dealer and utility of occasionally blocking the minions from reviving if he kills them.
- Mausoleum to provide his defensive buffs to improve the team’s survivability and occasionally block the freeze, heals and cleanse the debuffs placed on the team.
- Godseeker Aniri for heal, revive in case anyone dies and do damage.
Fire Knight 20
Fire Knight 20 requires more specialized champions, so we cannot just build a team of Defense-based champions. While Wurlim can help deal damage and nuke the waves, he is not actually very useful for the Fire Knight itself. He does not have any multi-hit to take down the shield and will only be useful for the buff he provides.
This is an example of a team that takes advantage of the multiple buffs he offers. This team is built around Seer to utilize the buffs to nuke the waves and Alure to keep the Fire Knights TM down. We have Wurlim and Mausoleum Mage to provide multiple buffs for Seer to strip and Stag Knight for AOE Decrease Defense.

Doom Tower with Wurlim
Wurlim has found himself a niche use in the latest Doom Tower Rotation against Bommal the Dreadhorn. This boss is by far the hardest DT Boss released and Wurlim’s ability to place an irresistible Decrease Accuracy debuff has become impactful against this boss. Recent change that allow Strengthen to reduce the damage received from bombs has also proven to be a boost.
Gear & Stats Build
Gearing Wurlim specifically for Bommal will be different from everywhere else he is used. This is a nasty boss that strips our buffs and replace them with bomb debuffs. For the strategy showcased in this guide, we will need to build our champions with high resistance.
We want to build our champs with around or close to 400 resistance. Next, we will need Wurlim to go first in the team to place his Dec Accuracy Debuff, so he will need to have more than 250 speed (This is Bommal’s speed). You can build him with around 250 accuracy so he can place his Freeze on his A1 against the Dreadbombs. Then, build him with as much HP and Def as possible. Forget about building him to do damage. You can use any stat increasing sets on him to achieve the required stats.
Recommended Main Stats
- Glove: HP%/Def%
- Chest: Resistance
- Boots: Speed
- Ring: HP/Def
- Amulet: HP/Def
- Banner: Resistance
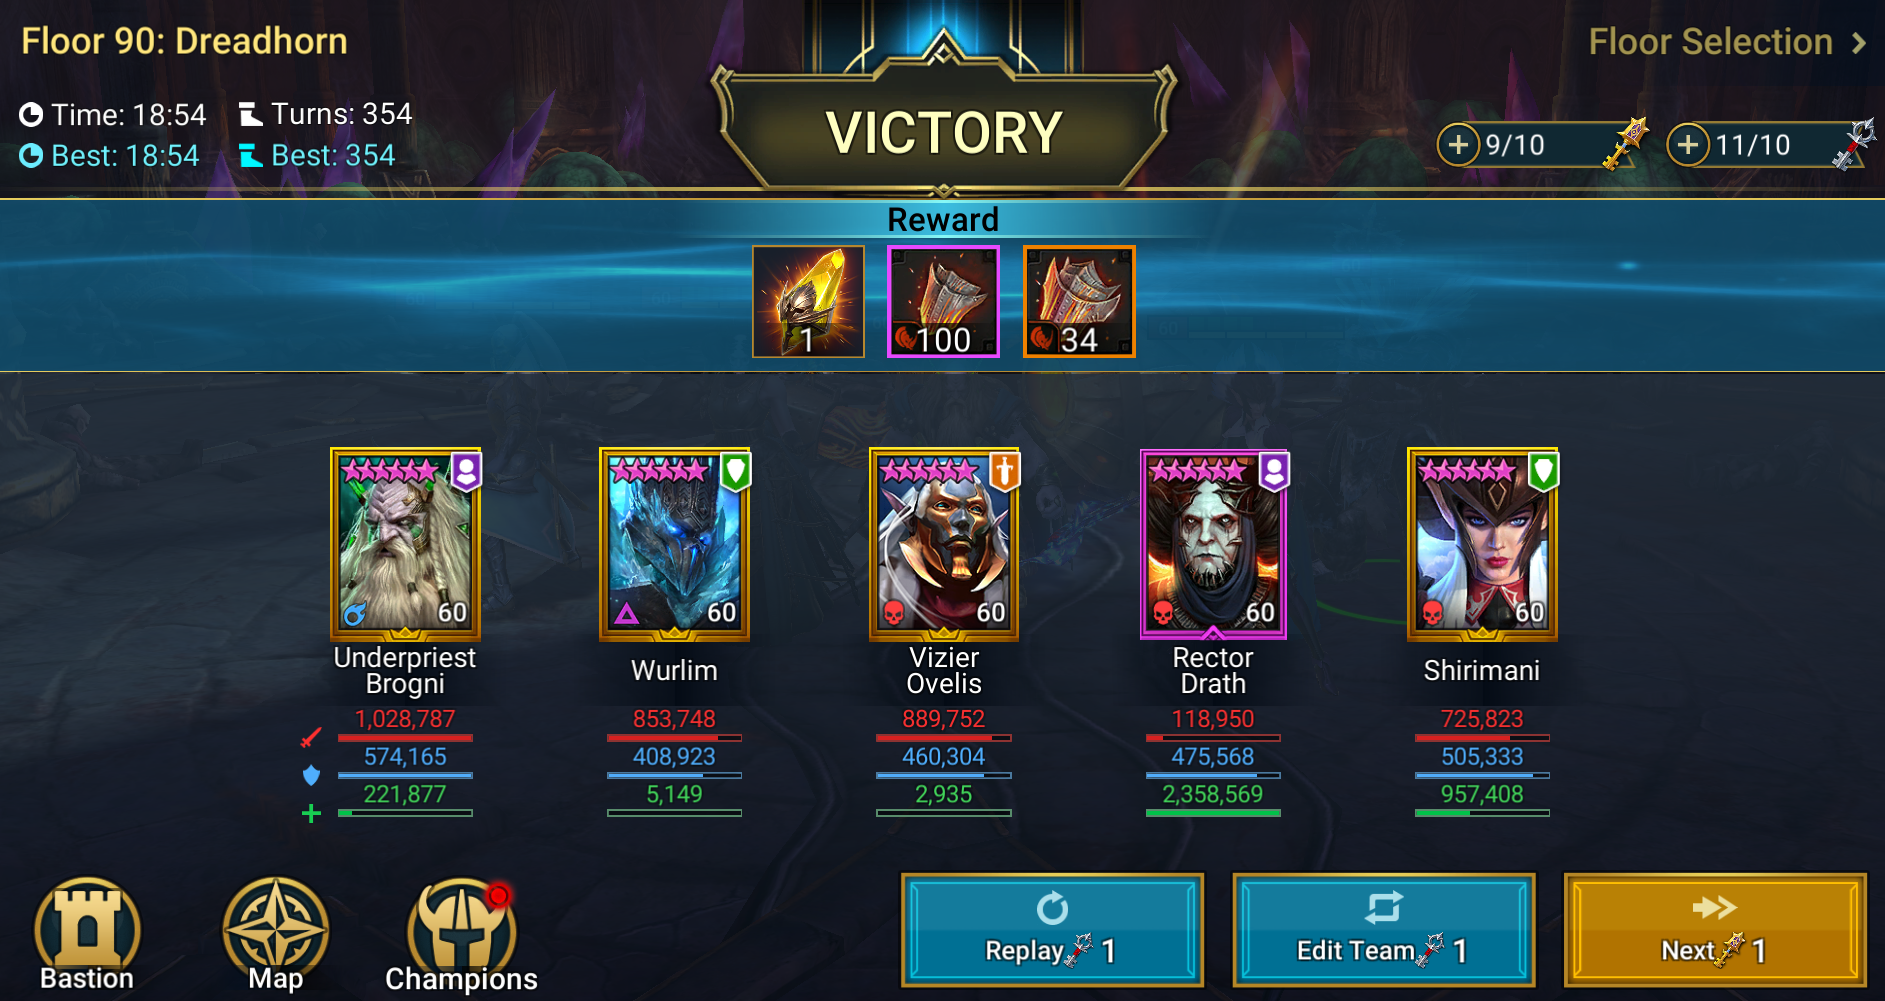
Hard Dreadhorn 90
Bommal the Dreadhorn is the toughest Doom Tower Boss released so far. His mechanics of placing Bomb debuffs, Stripping buffs and replacing them with bombs, summoning Dreadbombs which deal pure 40% Max HP damage, summons more Dreadbombs if his TM is decreased, and having an insane amount of Accuracy just to name a few of his mechanics make him extremely difficult to face.
The strategy used against Hard Bommal 90 in this guide is a Resistance team that places Dec Accuracy debuff on Bommal for the entire fight so we can negate the bombs and buff strip he does. For this strategy we have the following champions;
- Wurlim places the Dec Accuracy Debuff. This ability cannot be resisted so he doesn’t need to be built with high accuracy leaving space for his other stats. Also has a chance to freeze the Dreadbombs with his A1.
- Vizier places Dec Atk and Block Buffs to reduce incoming damage and prevent Bommal from placing Inc Atk buff on himself. Has the key role of extending the debuffs and making sure that they don’t fall off.
- Brogni provides protection against the team through his shield which also heals the team when they take damage. His aura also increase everyone’s resistance.
- Rector Drath provides heals and revives incase anyone dies. Her passive also increases everyone’s resistance.
- Shirimani AOE Freezes the Dreadbombs to reduce their damage. Also has a chance to freeze with her A1. Provides teamwide heals.
This team has to be fully manualed. This team also do not have any damage dealer. Damage is done entirely from Masteries, WM and GS, hence a long kill time. For an auto composition of this team a Duchess is required to be able to revive in case of the emergency instead of Shirimani.