Ursala the Mourner is an epic void affinity champion from the Banner Lords faction in Raid Shadow Legends. She has a fantastic kit with her A2 which is an AOE decrease attack and team buff increase attack, this is great for reducing incoming damage to the team, while maximising the damage output of your team at the same time. However, her A3 is even better, it provides a full team revive, turn meter, increase defence and strengthen to those who are revived. Ursala the Mourner is a great champion to use in many aspects of the game, including dungeon raids and arena. She is also effective in the Doom Tower, helping to keep team members alive after they have died and placing strong debuffs.
Ursala Stats Overview
- Faction: Banner Lords
- Type: Support
- Affinity: Void
- Rarity: Epic
- HP: 18000
- Attack: 1167
- Defense: 936
- Critical Rate: 15
- Critical Damage: 50
- Speed: 102
- Resistance: 30
- Accuracy: 15
- Aura: Increase Ally SPD in Doom Tower battles by 24
- Books to Max Skills: 14
Ursala Skills Overview

A1: Lance of Penitence
Attacks 1 enemy. Has a 40% chance of decreasing the target’s Turn Meter by 10%.
Upgrades as follows:
- Level 2: Damage +5%
- Level 3: Damage +5%
- Level 4: Buff/Debuff Chance +5%
- Level 5: Buff/Debuff Chance +5%
- Level 6: Buff/Debuff Chance +5%

A2: Waves of Grief
Attacks all enemies. Has a 75% chance of placing a 50% [Decrease ATK] debuff for 2 turns. Also places a 50% [Increase ATK] buff on all allies for 2 turns.
Upgrades as follows:
- Level 2: Damage +5%
- Level 3: Damage +5%
- Level 4: Damage +10%
- Level 5: Buff/Debuff Chance +5%
- Level 6: Buff/Debuff Chance +5%
- Level 7: Buff/Debuff Chance +5%
- Level 8: Buff/Debuff Chance +10%
- Level 9: Cooldown -1

A3: Requiem
Revives all dead allies with 75% HP, then fills their Turn Meters by 50%. Also places a 60% [Increase DEF] buff and a 25% [Strengthen] buff on all allies for 3 turns.
Upgrades as follows:
- Level 2: Cooldown -1
Ursala the Mourner Late Game Guide
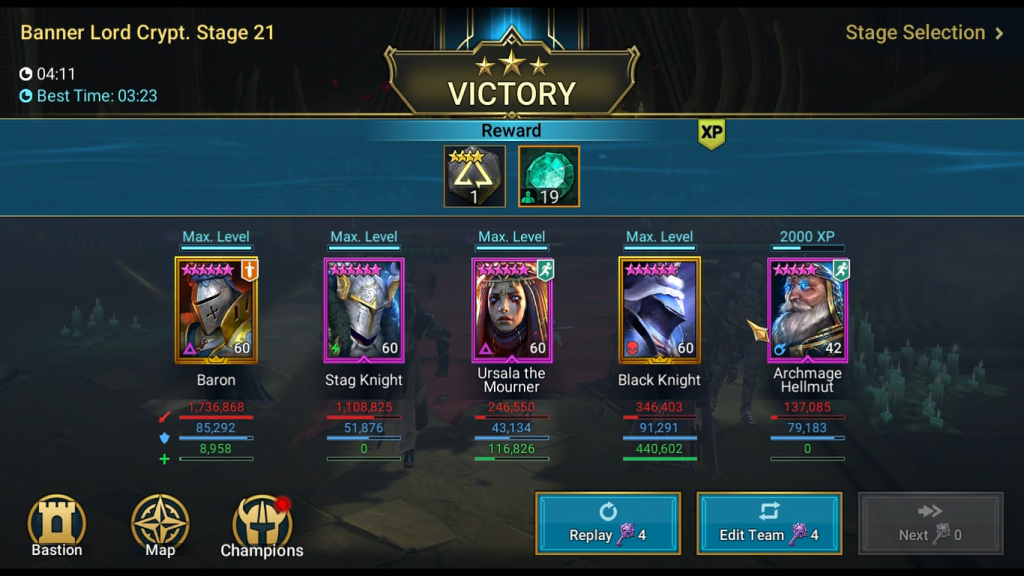
Ursala the Mourner is an extremely powerful champion and a crucial addition to the Bannerlords faction. Her introduction has allowed people to safely 3 star Faction Wars crypt 21 as currently the only other reviver in the faction was Raglin, a void legendary. She can work well in a support role in other content as well.
Ursala has an impressive kit for survivabillity. Her A1 can reduce Turn Meter. This can be useful but not very reliable. Her A2 offers an AOE Decrease ATK on enemies and Increase ATK on the team. Her A3 is one of the most powerful revives in the game because it combines high HP, TM and strong defensive buffs (DEF up + Strengthen) upon revival.
However, there are a few things to note for this last skill. These defensive buffs are incredibly strong for Clan Boss, but the odd cooldown does not allow her to offer 100% uptime in regular tunes. Moreover, she fills her allies’ TM on revive so using her against Grythion the Celestial Griffin (Doom Tower boss) is usually not advisable as he will gain the combined TM fill as well.
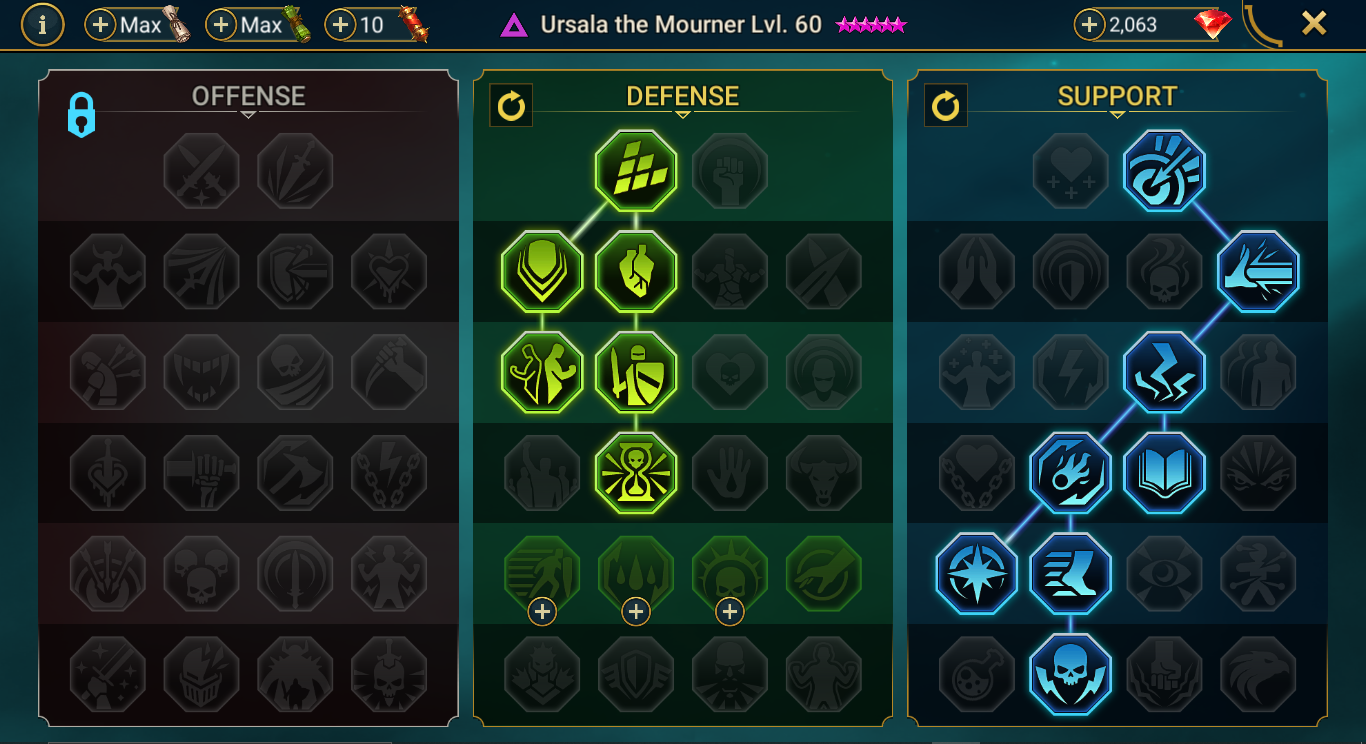
Masteries
For masteries, Defense and Support trees are used here for a pure support build for PvE contents other than Clan Boss. If you want to use her in CB, offense down to Warmaster and Defense or Support depending on your needs is the way to go. The Defense tree to maximise her survivability and the Support tree to add some accuracy and extend buffs.
For Hard Doom Tower 350+ resistance is preferred for higher stages, so Unshakeable can be selected to meet that requirement. In this guide Timely Intervention was picked as T6 because the Resistance stat was achieved using gear and TI allows her to get her turns more often.
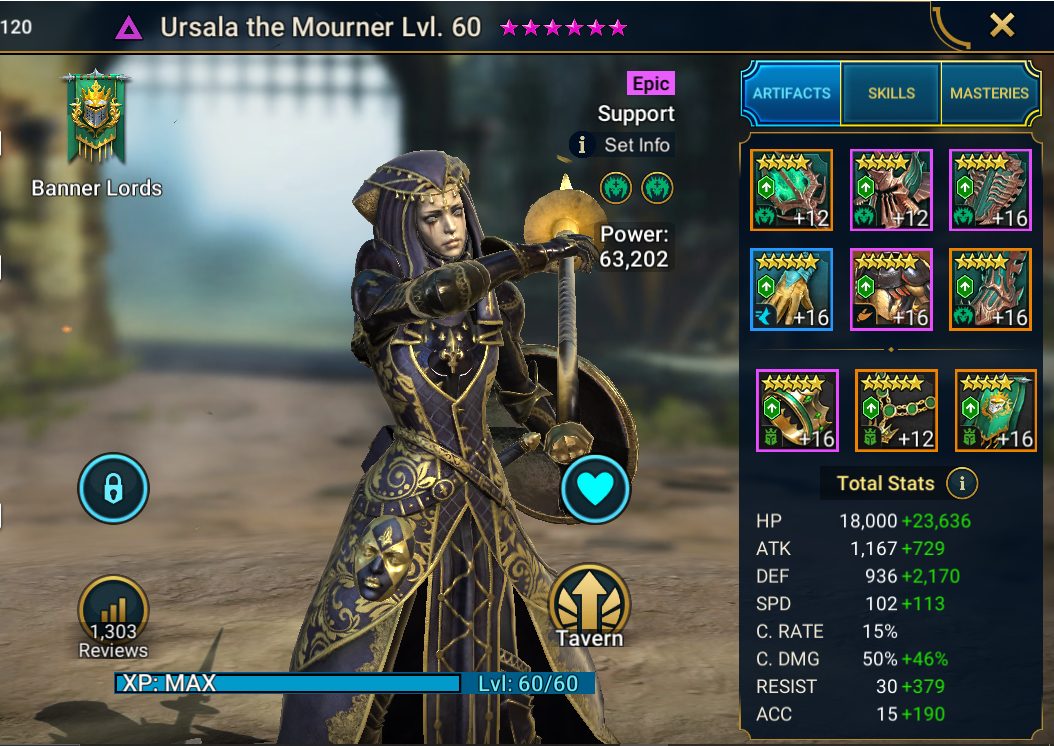
Gear & Stats Build
One of Ursala’s biggest weakness is that she doesn’t have a skill to heal herself. For dungeons 20+, you want around 220+ Resistance. 350+ for higher Doom Tower stages. In terms of Speed, over 200 would be best for her to cycle through her skills and lap waves. As for Accuracy to take advantage of her TM and atk down skill, 220+ for dungeons 20 and 350+ for Doom Tower Hard is required.
Everything else should go to her Defense and HP. As you can see, Ursala can be hard to gear on higher stages if you want to use her as a debuffer while keeping her support capabilities high. The build showcased here is for a pure support/buffer Ursala. The debuffs are usually covered by other champions.
For sets, Immortal and/or Regeneration are great on her as it allows her to keep her HP high, survive and revive. You can also opt for Speed, Perception or even Relentless if you run a healer with Ursala. As for accessories, Refresh and Cleansing can be useful but not mandatory. With her low base DEF, using DEF main stat on her accessories is advisable to shore up this weakness.
Recommended Main Stats
- Gloves: HP%/DEF%
- Chest: Resistance/HP%/DEF%
- Boots: Speed
- Ring: DEF
- Amulet: DEF
- Banner: Resistance/DEF/Accuracy
Faction Wars
For Faction Wars, before Ursala was released everything revolved around healing and crowd controling your enemies to keep the whole team healthy as you could not allow any champion to die if you wanted to achieve 3 stars. Ursala has made it significantly more comfortable to clear this crypt including auto-runs.
Team Build
The comp is as follows:
- Ursala – to revive any fallen champion and increases the team survivability.
- Black Knight – provides extra healing and consistent Defense up for the whole team.
- Stag Knight – a staple in this faction, takes care of debuffing and dealing damage alongside Baron.
- Baron – DPS role.
- Archmage Hellmut – provides offensive buffs and some crowd control.
Ursala Late Game Dungeon Runs
Dragon 20
Dragon 20 is still one of the most important an popular dungeons from mid-game to end-game. Ursala relevant and her kit can help supplement many types of teams.
Team Build
Ursala provides DEF Up and Strengthen buffs and an ATK down debuffs to ensure the team survives better on the waves and the boss. Revive is available as a failsafe and void affinity means she can easily ensure stable runs. She also provides an ATK up buff to help Kael hit harder. Tayrel provides AOE DEF down and single target ATK down. Apothecary provides the Speed buff and TM boost for the whole team Kael provides AOE damage on waves. Working in pair with Frozen Banshee, they keep the Dragon constantly poisoned and to pass the boss with ease.

Fire Knight 20
Fireknight 20 is another dungeon that is key to high-power sets like Savage and Immunity for Late Game.
Team Build
Ursala supporting capabilities can also help in those runs and the bonus TM control is somewhat helpful at the boss stage. Coldheart brings a 4 hit A1 and keeps the Fire Knight from taking a turn with her TM depletion and MAX HP Nuking ability. Armiger helps keep the tm down Stag Knight provides AOE DEF Down and Decrease Speed debuff on the boss Apothecary helps the team cycle through their turn faster

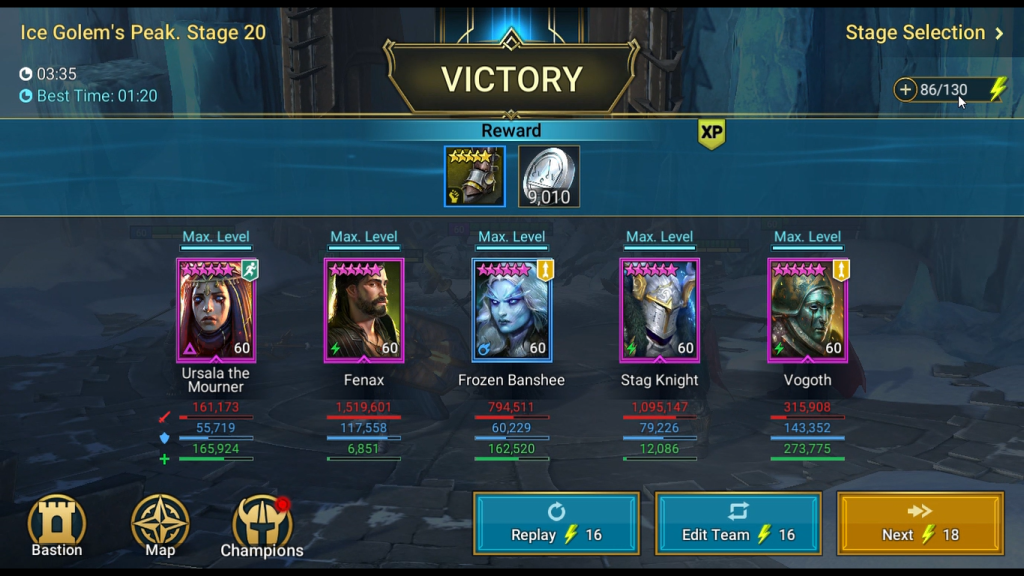
Ice Golem 20
Ice Golem 20 is a dungeon that truly benefits from a reviver such as Ursala because your champions can easily die by killing themselves on wave 2. Due to the Reflect Damage or at the boss stage when the retaliation passive of the boss activates.
Team Build
Fenax provides Block revive that is very helpful against this boss and can also prevent wave 2 from putting up Reflect Damage with his Block Active Skill or Block Buffs debuff. Vogoth provides extra protection with his constant healing. He can also provoke the second wave. Frozen Banshee puts poisons on the boss for extra damage. Stag Knight provides AOE DEF Down and Decrease Speed debuff on the boss
Spider 20
Ursala is useful in the Spider den, but falls off past stages 20 if you don’t have extra means to protect the team such as a big shield from Miscreated Monster or equivalents. Her ATK down debuff combined with her DEF up and Strengthen significantly improve your spider tank survivability.
Team Build
The team showcased here is based on a budget AOE HP Burn and TM reduction strategy as the main engines.
Psylar provides the Speed down debuff and TM control of the Spiderlings. She also brings an ACC Down debuff to ensure your tank can resists the poisons without stacking too much resistance. Apothecary keeps the team TM boosted and provides extra healing on the Spider tank. Armiger provides TM control on his A1 and an Enemy MAX HP skill on his A2. Ultimate Galek provides AOE HP Burn (enabled by Ursala’s ATK buff on him) and some extra TM control.

Arena Teams with Ursala
Arena is a very important part of the progress missions and often time the roadblock for many players. Ursala can work in different compositions to help you achieve victory. This part of the guide showcases her in 2 types of teams : Speed team designed to go first and a tank team designed to go second and retaliate (Resistance can be useful but not mandatory if you have a good line up for it)
Standard Team Build
Starting with go second teams, Seeker, Sandlashed Survivor and Vogoth are budget epic staples for these comps:
- Seeker in a Shield set puts up a Defense Up buff when hit by a critical hit and makes the team take much less damage (Lead or second position because of AOE hit order is strongly preferred). He can be Replaced with any high HP champion in a shield set.
- Sandlashed puts up Ally protection when a champion loses too much HP and prevents the team from being wiped.
- Vogoth, an incredible healer in a Guardian set to give more protection to the team.
- Rhazin was chosen as the nuker for this composition
If you don’t have Sandlashed or Vogoth, using 2 champions in a Shield set is possible and you should avoid buff removers such as Serris or Sethalia if you’re running it. A Defense based nuker is preferred because they can survive the attack from the opponents and their damage benefits directly from her defensive buffs.

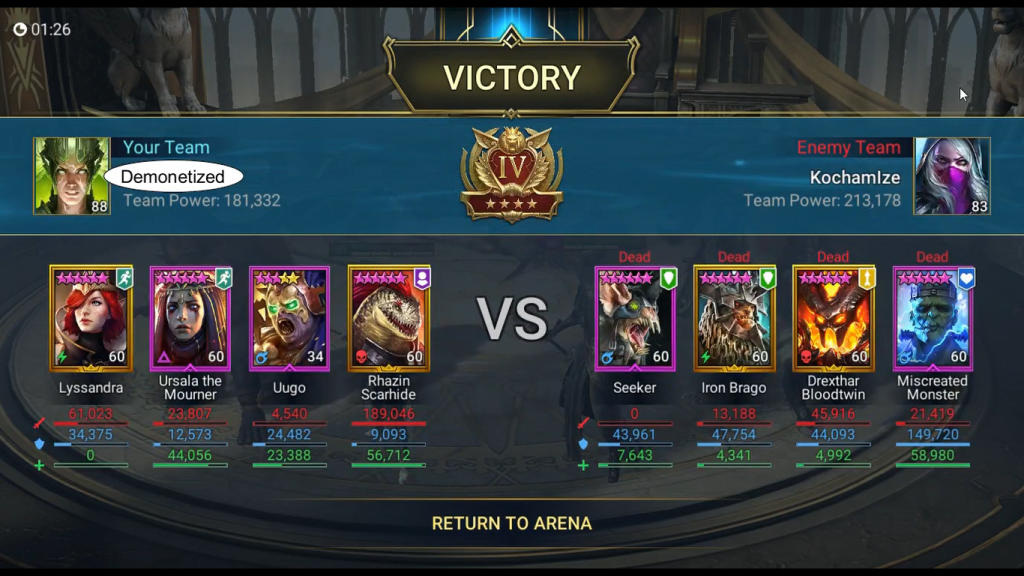
Speed Team Build
Speed teams are certainly the most common and popular choices for arena offense and Ursala can slot in perfectly too. The template for such a team is : A speed and/or TM booster, a buffer (Increase Attack or Defense, depending on what your nuker requires), a debuffer (AOE Decrease Defense) and finally a damage dealer.
The team showcase here follows that model:
- Lyssandra provides a Speed aura and good AOE TM manipulation. She can be replaced with Arbiter, Gorgorab, High Khatun etc
- Ursala is very good in this spot as she can buff either Attack or Defense, allowing her to enhance most nukers’ damage. Her other skills are not wasted as she also increases your survivability in case your team has failed to finish off the opponent. Increase Defense was used here to make Rhazin hit harder.
- Uugo works as an AOE Decrease Defense. She also brings a backup revive (or heal) and a Block Buffs debuffs that is extremely useful against Seeker, Skullcrown and any teams that rely on buffs. She should be placed in the last position to reach maximum potential
- Rhazin was the nuker here. Any strong AOE damage works.