Tatura Rimehide is a legendary spirit affinity champion from the high elves faction in Raid Shadow Legends. This champion is predominately for PVE, and a great addition to teams in the Doom Tower, particularly Bommal teams. His A1 is one of his best abilities, allowing you to decrease acc of the target, which if booked ahs a 100% chance of landing. All in all, Tatura is a strong champion, with applications at a wide variety of content. In this guide you can find information on how to build Tatura and strategies to use at content such as Bommal Dreadhorn.
Tatura Stats Overview
- Faction: High Elves
- Type: Defense
- Affinity: Spirit
- Rarity: Legendary
- HP: 20145
- Attack: 804
- Defense: 1432
- Critical Rate: 15
- Critical Damage: 50
- Speed: 102
- Resistance: 50
- Accuracy: 10
- Aura: Increase Ally in Doom Tower battles by 35
- Books to Max Skills: 9
Tatura Skills Overview

A1: Solar Ray
Attacks 1 enemy. Has an 80% chance of placing a 50% [Decrease ACC] debuff for 2 turns.
Upgrades as follows:
- Level 2: Damage +5%
- Level 3: Damage +10%
- Level 4: Buff/Debuff Chance +10%
- Level 5: Buff/Debuff Chance +10%

A2: Wings of Shelter
Places a [Block Debuffs] buff and a 60% [Increase DEF] buff on all allies for 2 turns.
Upgrades as follows:
- Level 2: Cooldown -1
- Level 3: Cooldown -1

A3: Otherworld Breach
Attacks all enemies. Places a [Perfect Veil] buff on all allies except this Champion for 2 turns. Also places a [Shield] buff on this Champion for 2 turns equal to 20% of the damage inflicted.
Upgrades as follows:
- Level 2: Damage +5%
- Level 3: Damage +10%
- Level 4: Cooldown -1
![Glimmer Hide [P]](https://www.gamingelephant.com/wp-content/uploads/2024/01/Glimmer-Hide-P.png "Glimmer-Hide-P")
A4: Glimmer Hide [P]
When attacked, reflects 30% of the damage this Champion receives back to the attacker. Also has a 30% chance of placing a [Freeze] debuff on the attacker for 1 turn.
Upgrades as follows:
- No books needed.
Melga Steelgirdle Late Game Build Guide
Tatura Rimehide is a champion that can be useful in a variety of areas of the game. The suite of buffs and debuffs allows her to be tailored to the content you’re using her in. This build focuses specifically on Bommal Dreadhorn in Doom Tower hard. Bommal Dreadhorn is one of the most difficult Doom Tower bosses and usually requires specific skill and stats to tackle him on highest difficulty on floor 90.
Skills
Tatura is unique in her high chance of Decrease Accuracy on A1, and her kit synergises very well for the rest of the fight to reduce incoming damage. A2 places Block Debuffs and Increase DEF on allies. A3 Places Pefect Veil that decreases AOE damage to the team and a shield on Tatura. Reflect on the Passive is a nice bonus. Tatura doesn’t need to be booked for this, which is a huge cost saving.
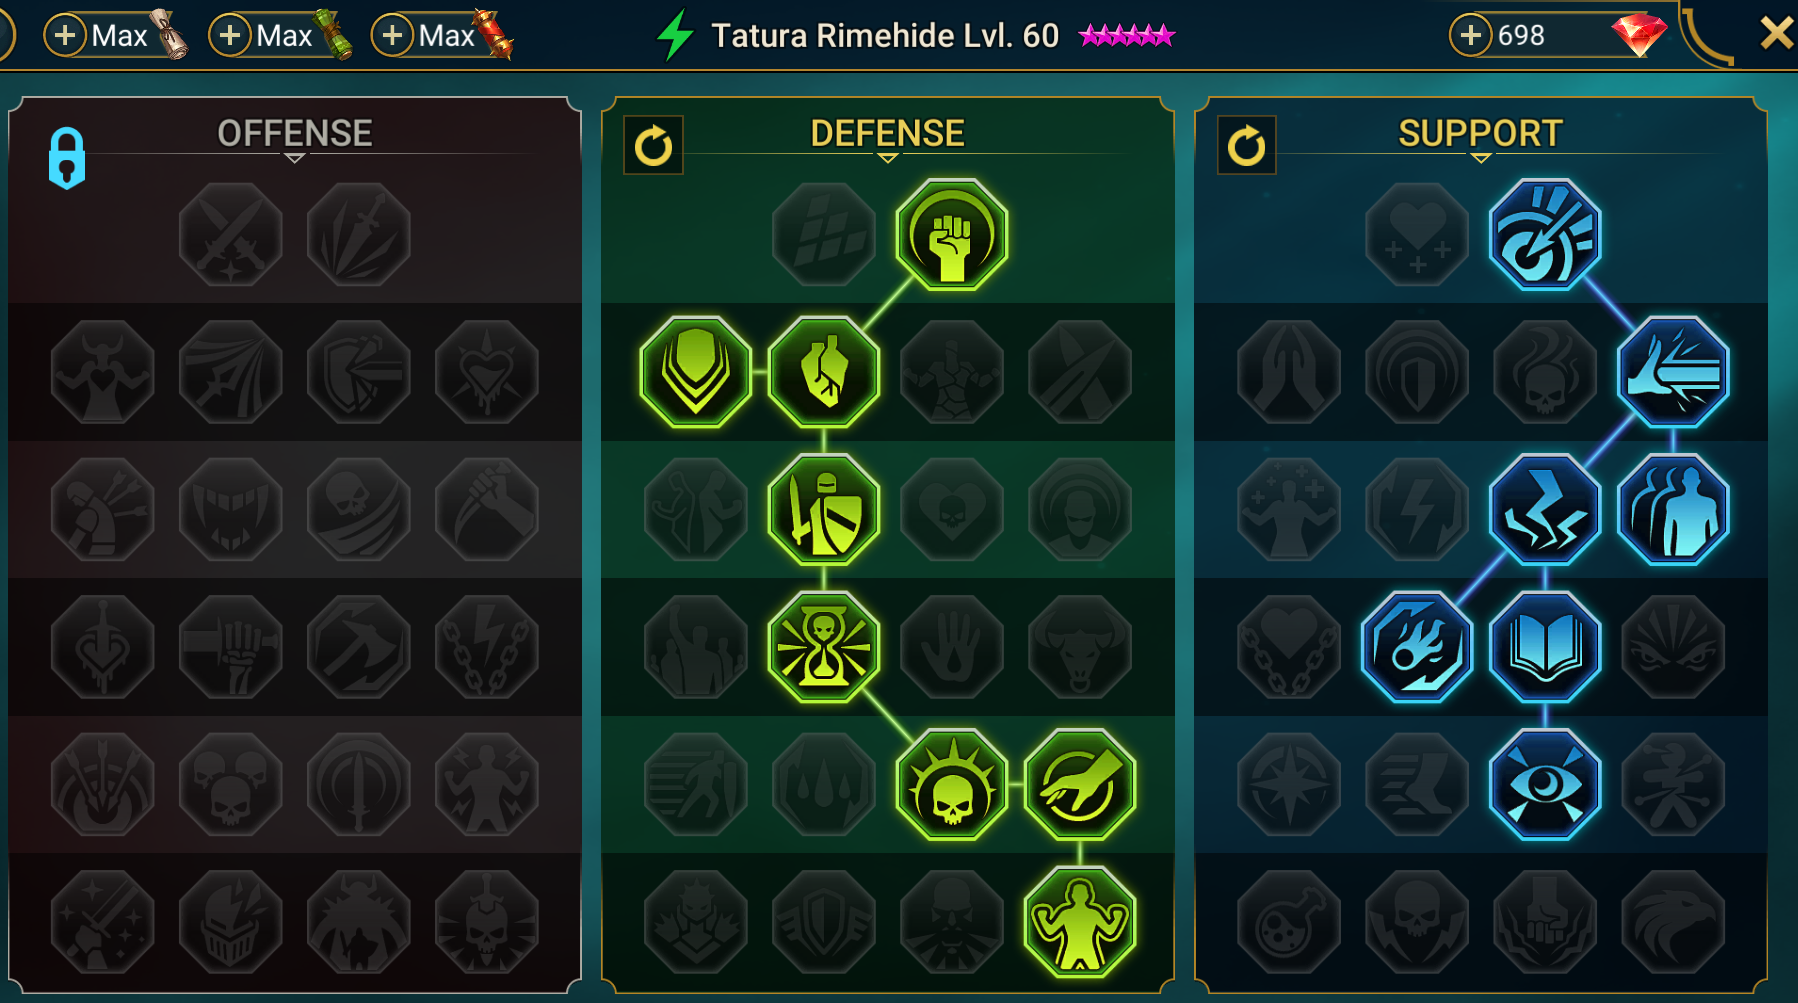
Masteries
The masteries are going to focused specific to Bommal. Because of this we take the Defense and Support tree and focus on survival.
Defensive is the main tree, the reason we select it is because it drastically reduces the damage that Bommal deals with points like Blastproof and Delay Death. We also need very high Resistance (500+) for floor 90 bommal so taking Unshakable is basically mandatory, along with the first mastery which gives +10 Resistance. Another important part of this build is taking the two counter attack masteries (bombal can stun to trigger Deterrence). The reason we do this is because Tatura is a carry for the fight since her a1 can keep a permanent accuracy down, without this, you can’t resist the boss, his Accuracy is just too high.
The support tree is a very similar concept to the defense tree, the aim is to be making sure that the A1 is landing as much as possible, so we take all the Accuracy masteries, as well as Arcane Celerity which provides some turn meter. Sniper is taken entirely because Tatura isn’t booked, and for this fight she doesn’t need to be. If you choose to book her, take Master Hexer instead. Lore of Steel is taken because the stat requirements on this fight can be very hard.
Gear & Stats Build
For this build the stat requirements are quite intense so make sure you’re getting as much stat boosts as possible from masteries, great hall, faction guards, auras etc. The numbers provided here are specific to hard DT level 90, so scale them down to your level accordingly. Her stat requirements can be very harsh for this fight. In this build Accuracy was lower than needed so it was substituted it with drexthar’s 70 Accuracy aura as an example. The required stats are as follows:
- 250+ Speed (You need this as you have to go before the boss and land your A1 otherwise your team is just going to get the full bomb damage and die).
- 500-560 Resistance is required to consistently resist the bomb debuffs, 500 Resistance is roughly a 10% chance for them to land, whereas 560 is 3%.
- 370+ Accuracy – you have to land the A1 otherwise your team will wipe, in a team attempting to Resistance the boss and tank the damage.
However, while not required, it is also recommended to have at least 45-50k health and 3.5k+ defense. These stats have leeway, you just need to make sure Tatura is tanky enough to survive both the bombs and Bommal attacks.
The recommended sets are Speed/Perception/Resistance. Basically you just want to use your sets to fill in the stat requirements. Because of this no set is mandatory, you just need to ensure you’re hitting those thresholds.
Recommended Main Stats
- Gloves: HP%
- Chest: Accuracy/Resistance
- Boots: Speed
- Ring: HP/Def
- Amulet: HP/Def (whichever has better accuracy/resistance rolls)
- Banner: Accuracy/Resistance

Bommal Dreadhorn Team & Strategy
The team used to down bombal 90 (hard) uses champions many people may have access to. However, it is a manual strategy and not suitable for auto runs. Tatura is the cornerstone. Bommal takes extra turns when he summons the bombs again, so you need to make sure you have 2 turns of Decrease Accuracy. If the boss isn’t about to use that skill, you can use other skills, assuming the Decrease Accuracy is currently up. This will help reduce the incoming damage between Increase Defense and Veil.
This team requires similar stats for all champions, you need to be able to roughly go 1:1 with the boss, all require 490+ Resistance, and high health. However, you can get away with lower health on the defense champs since the goal is to mitigate how much damage the boss himself does. You will still want decent health however, 40k+. Counter attack masteries are very important for this fight on Tatura and minaya, if tatura lands her A1 you can instead use her A2 or A3 (depending) to further reduce incoming damage. Minaya counter attacks help her sustain the team overall.
The champions used and their roles are as follows:
- Drexthar – in Deflection set to reflect bombs + HP burn application, he is the dps. Ninja or Geomancer would be good substitutes, Ninja also brings Freeze meaning you don’t need Shirimani.
- Minaya – She is here to be using her A3 after the bombs explode, the bombs deal 20% max health (40% total) when they explode while frozen, her a3 heals for 40% of max HP then places a shield.
- Shirimani – Can be replaced with Ninja, just here to freeze, she provides a bit of healing as well, however, if you use him, he can replace drexthar for HP burns, and thus opens this slot for another healer (godseeker aniri or vogoth are recommended).
- Tatura – A1 to keep the bosses accuracy down to a point where you can reliably resist all bombs (with 490-560 resistance) and Increase Def and Perfect Veil buffs for longer team life.
- Scyl – Healing and can revive incase its needed, Vrask, Doom Priest are alternatives.
